openssl常用功能
一、概述
openssl: 在计算机网络上,OpenSSL是一个开放源代码的软件库包,应用程序可以使用这个包来进行安全通信,避免窃听,同时确认另一端连线者的身份。这个包广泛被应用在互联网的网页服务器上。
参考资料:
wiki - OpenSSL
阿里云 - 生成CA证书
博客园 - openssl用法详解
知乎 - Self-Signed SSL证书创建和使用
1.1 openssl组成
/usr/bin/openssl- 可执行命令行工具../libcrypt.so- 实现数据加密功能的库文件(供第三方使用)../libssl.so- 实现tsl/ssl功能的库文件(供第三方使用)
使用
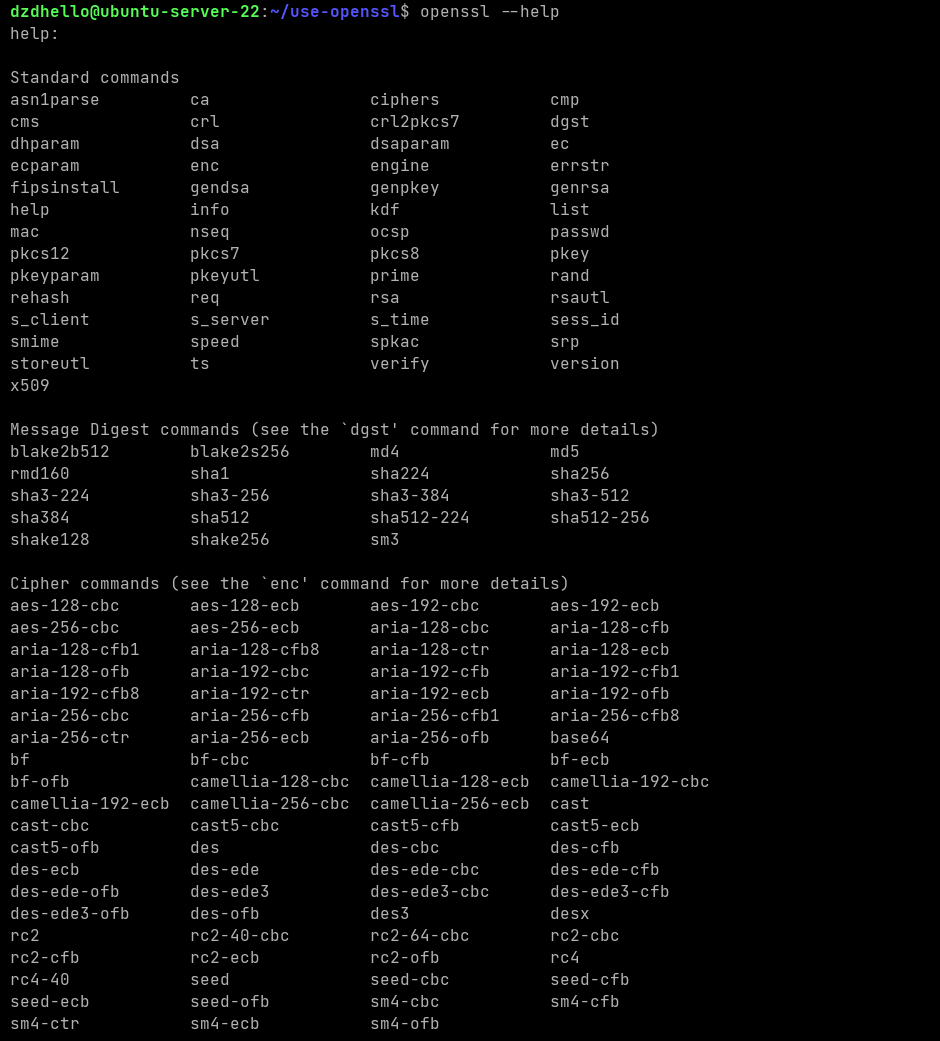
openssl --help可以看到,这要分为标准命令、消息摘要命令以及密码相关命令
使用openssl dgst和openssl enc可以分别查看具体详情
1.2 功能
- 单向加密(提取文件特征码) - 只加密不解密,根据选择算法的算法输出固定长度特征码
openssl dgst [-md5|-md4|-md2|-sha1|-sha] [file...] - 对称加密 - 加密解密使用同一个密钥(加密速度快)
openssl enc -ciphername [-in filename] [-out filename] - 非对称加密 - 加密解密使用一对密钥(公钥、私钥,公钥是从私钥中提取出来的),常见算法rsa、dsa
首先要生成私钥:
openssl genrsa [-out filename] [numbits]
从私钥中提取公钥:openssl rsa [-in filename] [-pubout] [-out filename] - 生成随机数 - num 指定生成字节数(如1,生成1字节=8位),-hex指定以十六进制显示生产的随机数
openssl rand [-hex] num
二、常用功能
2.1 查看文件MD5或sha256值
dzdhello@ubuntu-server-22:~/use-openssl$ echo 'Hello world!' > hello.txt
dzdhello@ubuntu-server-22:~/use-openssl$ ls
hello.txt
dzdhello@ubuntu-server-22:~/use-openssl$ openssl dgst -md5 hello.txt
MD5(hello.txt)= 59ca0efa9f5633cb0371bbc0355478d8
dzdhello@ubuntu-server-22:~/use-openssl$ openssl dgst -sha256 hello.txt
SHA2-256(hello.txt)= 0ba904eae8773b70c75333db4de2f3ac45a8ad4ddba1b242f0b3cfc199391dd8
2.2 使用-des3进行对称加密
openssl enc -ciphers命令可以查看支持的对称加密算法-k- 指定需要的密码;-kfile infile- 可以从文件中读取密码(推荐)-e- 加密-d- 解密
注意:解密一定要使用同样的算法以及密码,且加上了-d参数
dzdhello@ubuntu-server-22:~/use-openssl$ openssl enc -k 123456  -des3 -in hello.txt -out hello.txt.encrm hello.txt.enc
enc: Use -help for summary.
dzdhello@ubuntu-server-22:~/use-openssl$ cat hello.txt.enc && echo
Y��}"�L�A�k��c��
dzdhello@ubuntu-server-22:~/use-openssl$ openssl enc -d -k 123456 -des3 -in hello.txt.enc -out hello.txt.enc.dec
*** WARNING : deprecated key derivation used.
Using -iter or -pbkdf2 would be better.
dzdhello@ubuntu-server-22:~/use-openssl$ cat hello.txt.enc.dec
Hello world!
2.3 生成随机数
dzdhello@ubuntu-server-22:~/use-openssl$ openssl rand -hex 6
7da9b512b8a9
2.4 生成rsa密钥对
1. 生成私钥
dzdhello@ubuntu-server-22:~/use-openssl$ openssl genrsa -out ./key.pri 2048
dzdhello@ubuntu-server-22:~/use-openssl$ cat key.pri
-----BEGIN PRIVATE KEY-----
MIIEvQIBADANBgkqhkiG9w0BAQEFAASCBKcwggSjAgEAAoIBAQCtYgW+4OJWXj/V...
-----END PRIVATE KEY-----
2. 提取公钥
dzdhello@ubuntu-server-22:~/use-openssl$ openssl rsa -in key.pri -pubout -out key.pub
writing RSA key
dzdhello@ubuntu-server-22:~/use-openssl$ cat key.pub
-----BEGIN PUBLIC KEY-----
MIIBIjANBgkqhkiG9w0BAQEFAAOCAQ8AMIIBCgKCAQEArWIFvuDiVl4/1VFf+X9q...
-----END PUBLIC KEY-----
将公钥转为ssh-key格式: ssh-keygen -i [-f input_keyfile] [-m key_format]
dzdhello@ubuntu-server-22:~/use-openssl$ ssh-keygen -i -f key.pub -m PKCS8
ssh-rsa AAAAB3NzaC1yc2EAAAADAQABAAABAQCtYgW+4OJWXj/VUV/5f2q...
3. 创建证书签名请求文件(certificate signing request,CSR)
dzdhello@ubuntu-server-22:~/use-openssl$ openssl req -new -key key.pri -out yourdomain.csr
You are about to be asked to enter information that will be incorporated...
dzdhello@ubuntu-server-22:~/use-openssl$ cat yourdomain.csr
-----BEGIN CERTIFICATE REQUEST-----
MIICljCCAX4CAQAwUTELMAkGA1UEBhMCY24xCzAJBgNVBAgMAm5...
-----END CERTIFICATE REQUEST-----
2.5 配置CA服务器
输入命令
openssl ca,根据提示得知:
1. 配置文件为/usr/lib/ssl/openssl.cnf(那就指定自定义的配置文件)
2. 没有找到CA私钥(那就在所需要的位置生成私钥)
dzdhello@ubuntu-server-22:~/use-openssl$ openssl ca
Using configuration from /usr/lib/ssl/openssl.cnf
Could not open file or uri for loading CA private key from ./demoCA/private/cakey.pem
4037DA137C7F0000:error:16000069:STORE routines:ossl_store_get0_loader_int:unregistered scheme:../crypto/store/store_register.c:237:scheme=file
4037DA137C7F0000:error:80000002:system library:file_open:No such file or directory:../providers/implementations/storemgmt/file_store.c:267:calling stat(./demoCA/private/cakey.pem)
- 设置新的配置,并根据配置创建相应目录/文件:
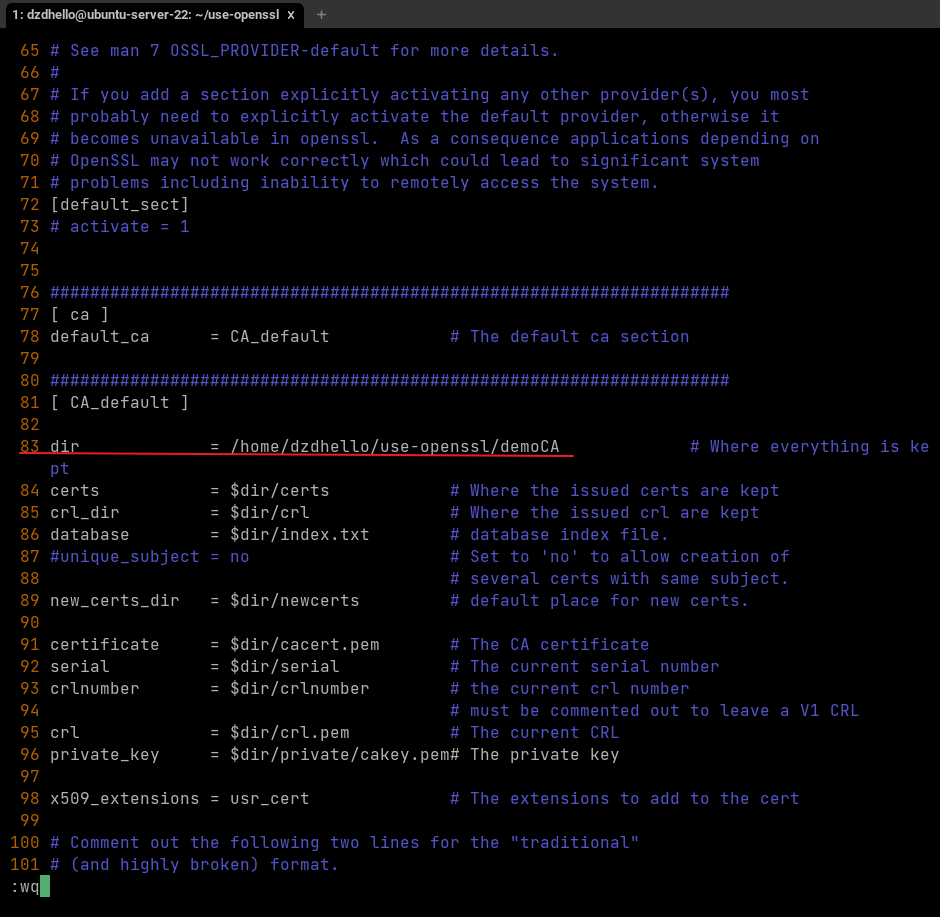
cp /usr/lib/ssl/openssl.cnf ./ - 修改openssl.cnf -> dir目录:
vim openssl.cnf
再次查看配置情况,这次指定配置文件:
openssl ca -config ./openssl.cnfdzdhello@ubuntu-server-22:~/use-openssl$ openssl ca -config ./openssl.cnf Using configuration from ./openssl.cnf Could not open file or uri for loading CA private key from /home/dzdhello/use-openssl/demoCA/private/cakey.pem 40570153937F0000:error:16000069:STORE routines:ossl_store_get0_loader_int:unregistered scheme:../crypto/store/store_register.c:237:scheme=file 40570153937F0000:error:80000002:system library:file_open:No such file or directory:../providers/implementations/storemgmt/file_store.c:267:calling stat(/home/dzdhello/use-openssl/demoCA/private/cakey.pem) - 创建相应目录、文件
dzdhello@ubuntu-server-22:~/use-openssl$ mkdir -p -v /home/dzdhello/use-openssl/demoCA/{serts,crl,newcerts,private} mkdir: created directory '/home/dzdhello/use-openssl/demoCA' mkdir: created directory '/home/dzdhello/use-openssl/demoCA/serts' mkdir: created directory '/home/dzdhello/use-openssl/demoCA/crl' mkdir: created directory '/home/dzdhello/use-openssl/demoCA/newcerts' mkdir: created directory '/home/dzdhello/use-openssl/demoCA/private' dzdhello@ubuntu-server-22:~/use-openssl$ touch /home/dzdhello/use-openssl/demoCA/{serial,index.txt} - 指明证书的开始编号:
dzdhello@ubuntu-server-22:~/use-openssl$ echo 01 >> demoCA/serial - 生成CA私钥,路径为
/home/dzdhello/use-openssl/demoCA/private/cakey.pemdzdhello@ubuntu-server-22:~/use-openssl$ openssl genrsa -out /home/dzdhello/use-openssl/demoCA/private/cakey.pem 4096 - 生成证书请求csr文件
dzdhello@ubuntu-server-22:~/use-openssl$ openssl req -new -key /home/dzdhello/use-openssl/d emoCA/private/cakey.pem -out /home/dzdhello/use-openssl/demoCA/private/cakey.csr You are about to be asked to enter information that will be incorporated... dzdhello@ubuntu-server-22:~/use-openssl$ tree demoCA/ demoCA/ ├── crl ├── index.txt ├── newcerts ├── private │ ├── cakey.csr │ └── cakey.pem ├── serial └── serts 4 directories, 4 files - 生成CA证书,路径为
/home/dzdhello/use-openssl/demoCA/cacert.pemdzdhello@ubuntu-server-22:~/use-openssl$ openssl x509 -req -days 365 -in /home/dzdhello/use-openssl/demoCA/private/cakey.csr -signkey /home/dzdhello/use-openssl/demoCA/private/cakey.pem -out /home/dzdhello/use-openssl/demoCA/cacert.pem Certificate request self-signature ok subject=C = cn, ST = guangdong, L = shenzheng, O = dzdhello, OU = dzdhello.c, CN = dzd, emailAddress = dzdhello@163.com
到此为止,配置完成,注意使用openssl ca命令需要指定配置文件-config
2.6 为客户端证书签名
为之前生成的证书签名请求csr文件
yourdomain.csr签名
注意:签名的客户端请求文件发起时填入的organizationName字段要和CA服务一致,否则会提示The organizationName field is different between CA certificate (dzdhello) and the request (t1)而导致签名失败
(我这里就是因为前面生成的证书签名请求文件即csr文件签名失败,才重新生成的yourdomain3.csr)
dzdhello@ubuntu-server-22:~/use-openssl$ openssl ca -config /home/dzdhello/use-openssl/openssl.cnf -in yourdomain3.csr -out ./yourdomain.crt
Using configuration from /home/dzdhello/use-openssl/openssl.cnf
Check that the request matches the signature
Signature ok
Certificate Details:
        Serial Number: 1 (0x1)
        Validity
            Not Before: Aug  8 20:26:14 2022 GMT
            Not After : Aug  8 20:26:14 2023 GMT
        Subject:
            countryName               = cn
            stateOrProvinceName       = guangdong
            organizationName          = dzdhello
            organizationalUnitName    = ttt
            commonName                = t
            emailAddress              = t@123.com
        X509v3 extensions:
            X509v3 Basic Constraints:
                CA:FALSE
            X509v3 Subject Key Identifier:
                93:0C:0E:81:39:D2:39:F4:F7:DE:A5:94:8F:29:8C:EB:1D:EF:83:E9
            X509v3 Authority Key Identifier:
                DirName:/C=cn/ST=guangdong/L=shenzheng/O=dzdhello/OU=dzdhello.c/CN=dzd/emailAddress=dzdhello@163.com
                serial:70:CD:F8:6B:8E:F9:5C:41:A2:6A:A2:25:F3:32:65:2A:5E:E6:C6:64
Certificate is to be certified until Aug  8 20:26:14 2023 GMT (365 days)
Sign the certificate? [y/n]:y
1 out of 1 certificate requests certified, commit? [y/n]y
Write out database with 1 new entries
Data Base Updated
2.7 转换证书为PKCS12文件
dzdhello@ubuntu-server-22:~/use-openssl$ openssl pkcs12 -export -clcerts -in ./yourdomain.crt -inkey ./key.pri -out ./yourdomain.p12
Warning: -clcerts option ignored with -export
Enter Export Password:
Verifying - Enter Export Password:
dzdhello@ubuntu-server-22:~/use-openssl$ ll yourdomain.p12
-rw------- 1 dzdhello dzdhello 3123 Aug  8 20:43 yourdomain.p12
三、配置证书到服务器端
配置客户端私钥(key.pri)以及证书(yourdomain.crt)文件到服务器
3.1 nginx配置(待验证)
server {
  listen 443 ssl;
  #
  ssl_certificate  /usr/local/nginx/cert/server.crt; # 证书文件
  ssl_certificate_key  /usr/local/nginx/cert/server.key; # 私钥
}
终于写完了。。。

